Bluetit Diary    Mar 2007 (4)


Monday 5th March, 2007

I spend a fair time yesterday morning reshaping the insides of the BBB (Bigg Bird Box).  We had watched the visiting bluetit display at its image in the glass wall too frequently for our liking and I decided to try to find another way of preventing birds from getting at the camera.

The problem with the sheet of glass as we saw it was that a bird inside the nest area clearly saw an image of himself reflected in it.  In addition, we expected that it would get dirty as time passed, particularly when the chicks grew big enough to leave the nest cup and practise wing flapping - in other words, just as things would be getting really interesting!

Because we already had a bird roosting in the box, I felt that I should design something that I could add pretty quickly so that the box was out of action for as short a time as possible.  Originally, I had hoped that it could be done without removing the box at all, but I soon found that trying to re-focus the camera after it had been knocked was very difficult without my being able to see the effect of a change directly. 

I therefore settled on designing a structure that could be built without having the box to hand and then slotted into place when it had been completed.  In the end, it didn't work out quite like that - some of my measurements must have been a bit too approximate, but I managed to keep the time the box was off the wall to a couple of hours in the morning.

Although I took several photographs of the project at its various stages, I forgot the check that the auto focus was switched on so all the images are slightly out of focus.  Still, they are better than nothing!

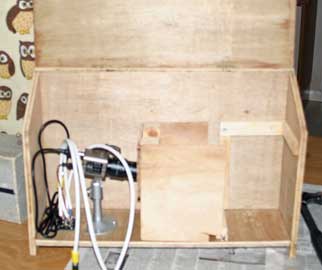
This is the box after it had been removed from the wall outside our house and had the glass plate and most of its supports removed.  The planned nest area is at the right hand side of the picture.  Power and video cables come into the box via a plate upon which four phono sockets have been mounted.  There are two power connections - one being for the cameras and the IR lighting, and the other is for the LED lighting.

The other two phono connections are to carry the video signals from the two cameras.

The new object shown in this picture is made of plywood and is a box with only four sides in place.  The side next to the camera has a hole in it which is just bigger than the camera lens.  The other two vertical sides are to give the structure rigidity and stability.  The floor of the box consists of a ramp starting from about 1 inch above the floor on the right hand side of the picture and going to a point just below the camera lens on the left.

This shows the construction from above.  You can see the hole for the camera lens in the left hand wall, and the ramp at the bottom of the new open box construction.  The right hand end of the ramp rests on a block of wood about 1 inch thick which runs across the bottom of the box.  My hope is that this will create a naturally 'right' place for any bird to build its nest - namely underneath the camera mounted in the roof!

When the front is put back and the box is reassembled, this is what it looks like.  The only significant item still to be added is a roof above the ramp.  This is the fifth side of the new box construction and is needed to prevent a bird flying over the partition into the camera area.


One of the problems we originally had with the BoxWatch design was that it was possible for an enterprising bird to fly up and scramble through the gap between the camera and the edge of the roof plate.  This enabled it to enter the roof space which was nice and warm from the heat of the camera.  We started this diary in January 2001 and at that time knew little or nothing of the behaviour of nesting bluetits, so we didn't realise how unusual it was for us to have two birds roosting in the same box - one in the roof space and the other on the floor of the box.

We stopped such access in subsequent years by gluing an open ended cylinder to the circular hole in the roof plate.  We had to do this as the bird roosting at the top had been pecking at the camera's cables and had reached the wire inside in one place!

This sketch shows what I mean.  The cylinder is shown in cross section as two parallel vertical lines below the camera which is mounted on a cross member within the roof.

The outcome so far looks positive.  The bluetit had a look around yesterday afternoon and roosted as usual overnight.  This morning it popped back inside a couple of times.  This image was taken during one of those visits and shows what excellent quality pictures the setup is now capable of taking.

We are now keeping our fingers crossed!