The Bigg Bird Box (Box3)
Introduction
Until this year, all our bird boxes contained a camera installed directly above the nesting area. This shows a good view of what is going on in the nest except that one can only see the top view of both the parent birds and also the chicks. When watching the BBC's SpringWatch programme we were captivated by the different views they showed of the inside of the nest box and decided to try something along these lines ourselves. I therefore decided to build a nest box that was big enough to contain a camera beside the nest cup and looking across it.
The first design
 The
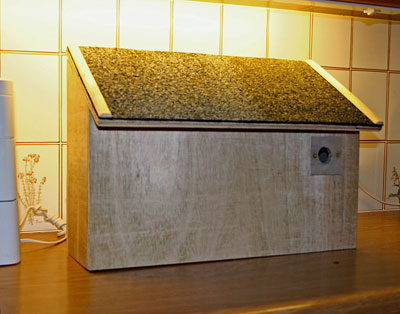
picture on the left was taken in our kitchen and shows the finished box shortly
before it was mounted. It is made of half inch weather resistant ply and is 20" wide,
13" high at the back and 10" high at the front with a sloping roof covered with
roofing felt. It is 5" deep inside from front to back. At the right
hand end, the bird's compartment is 5" x 5" separated from the camera area by a
sheet of glass. Above this compartment is a baffle on which is mounted the
lights and one of the cameras - the same type as now used in the BoxWatch
boxes.
The
picture on the left was taken in our kitchen and shows the finished box shortly
before it was mounted. It is made of half inch weather resistant ply and is 20" wide,
13" high at the back and 10" high at the front with a sloping roof covered with
roofing felt. It is 5" deep inside from front to back. At the right
hand end, the bird's compartment is 5" x 5" separated from the camera area by a
sheet of glass. Above this compartment is a baffle on which is mounted the
lights and one of the cameras - the same type as now used in the BoxWatch
boxes.
The base of the box is recessed by 1" and has embedded within it a plate which has 4 phono plugs from Maplin (part code BW74R). Two are used for the two cameras' video signals and the other two for two 12v supplies, one controlling the visible lighting and the other the cameras and IR lighting. This means that when dusk falls the visible lighting can be switched off leaving the side view camera still recording what is happening by infra red. This is currently done manually but I hope to install automatic switching shortly, based on a light sensitive resistor.
The side view camera, which is a Watec WAT-232 with a zoom lens, is mounted on a small camera stand which is about 4" high and enables the camera to point slightly down to the level at which I anticipate the nest cup will be when the nest has been built. There is a fair amount of guesswork needed here, but we have found that the nest is normally about 1Ẅ" to 2Ẅ" deep by the time the eggs have hatched out. Not having had an IR sensitive camera before, we have no idea what to expect over night. Probably pictures of sleeping birds!
The nest box revisited
After a few weeks, it became apparent that the bluetit that was a regular visitor to the new box, was getting increasingly worked up about its image in the glass plate. In addition, despite my treating it with something to make dirt less likely to stick, it had started to get dust on it. I therefore decided to try to design a structure that could be built without having the box to hand and then slotted into place when it had been completed. The purpose of this new structure was to keep any bird entering the box away from the camera area, and encourage it to nest at the right hand end of the box, without having to resort to a pane of glass. In the end, it didn't work out quite like that - some of my measurements must have been a bit too approximate, but I managed to keep the time the box was off the wall to a couple of hours in the morning.
Although I took several photographs of the project at its various stages, I later found that the check that the auto focus was not switched on so all the images are slightly out of focus. Still, they are not too bad and certainly better than nothing!
|
|
 The
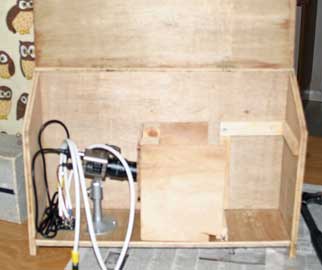
new structure shown in the centre of the picture is made of plywood and is
a box with only four sides in place. The side next to the camera has a
hole in it which is just bigger than the camera lens. The other two
vertical sides are to give the structure rigidity and stability. The
floor of the structure consists of a ramp starting from about 1 inch above the
floor of the box on the right hand side of the picture and going to a point just
below the camera lens on the left. The
new structure shown in the centre of the picture is made of plywood and is
a box with only four sides in place. The side next to the camera has a
hole in it which is just bigger than the camera lens. The other two
vertical sides are to give the structure rigidity and stability. The
floor of the structure consists of a ramp starting from about 1 inch above the
floor of the box on the right hand side of the picture and going to a point just
below the camera lens on the left.It has been designed this way to encourage a bird to think that the natural place for a nest is within the 5 x 5 inch area to the right. This is the right distance from the side mounted camera and also nicely beneath the overhead camera. Knowing bluetits though, if they build a nest at all, it will probably be on the ramp! |
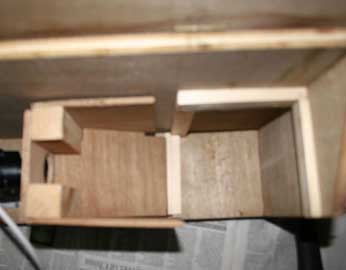 This
shows the structure from above. You can see the hole for the camera
lens in the left hand wall, and the ramp at the bottom of the new open
box construction. The right hand end of the ramp rests on a strip of
wood about 1 inch thick which runs across the bottom of the nest box. This
shows the structure from above. You can see the hole for the camera
lens in the left hand wall, and the ramp at the bottom of the new open
box construction. The right hand end of the ramp rests on a strip of
wood about 1 inch thick which runs across the bottom of the nest box. |
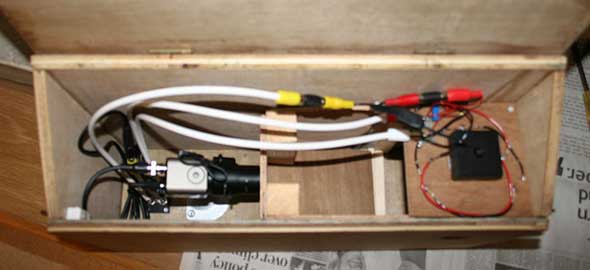 When
the front is put back and the nest box is reassembled, this is what it looks
like. The only significant item still to be added is a roof above the
ramp. This is the fifth side of the new box construction and is needed
to prevent a bird flying over the partition into the camera area. When
the front is put back and the nest box is reassembled, this is what it looks
like. The only significant item still to be added is a roof above the
ramp. This is the fifth side of the new box construction and is needed
to prevent a bird flying over the partition into the camera area. |
Later note written in January 2012
During the winter of 2010/11, I rebuilt the box using proper marine grade plywood as the weather resistant stuff I had used initially was not weather resistant enough and was warping and delaminating badly. The new box was built largely to the same design but the base of the nesting area was raised by about 1 inch in order to get a better angle with the side mounted camera. I also connected the microphone that was part of the top camera so that we could listen to sound inside the box when this became interesting.
Finally, I moved the box's entrance hole about three quarters of an inch to the left when viewed from the outside. We have found that nesting females build the nest cup as far away from the entrance hole as they can, presumably to reduce the risk of predation. By moving the entrance in this direction I hoped to encourage the female to build the nest cup in the far left hand corner of the box when viewed from the side camera. This change was successful and the nest built in 2011 was just where I had hoped it would be.